The Date Ranges screen has four tabs across it
- Date Range (this page)
- Date Range - Rate Set
- Date Range - Rates
- Date Range - Other
NOTE: These four tabs apply to the Date Range/Price Code rates season with which you are currently working.
Set the Date Range for a Rate
- Make sure a rate and date range has already been added (see Add a Rate).
- From the Product Setup - Rates screen, click a Rate Period to update it.
-
Select the
 Date Range tab.
- Make any changes required (in fields that are not read-only). Refer to About the Date Range tab fields for more information on these fields.
- If necessary, continue with updates to information in other Rate tabs.
-
ClickSave to keep the changes.

-
ClickExit to discard any changes.

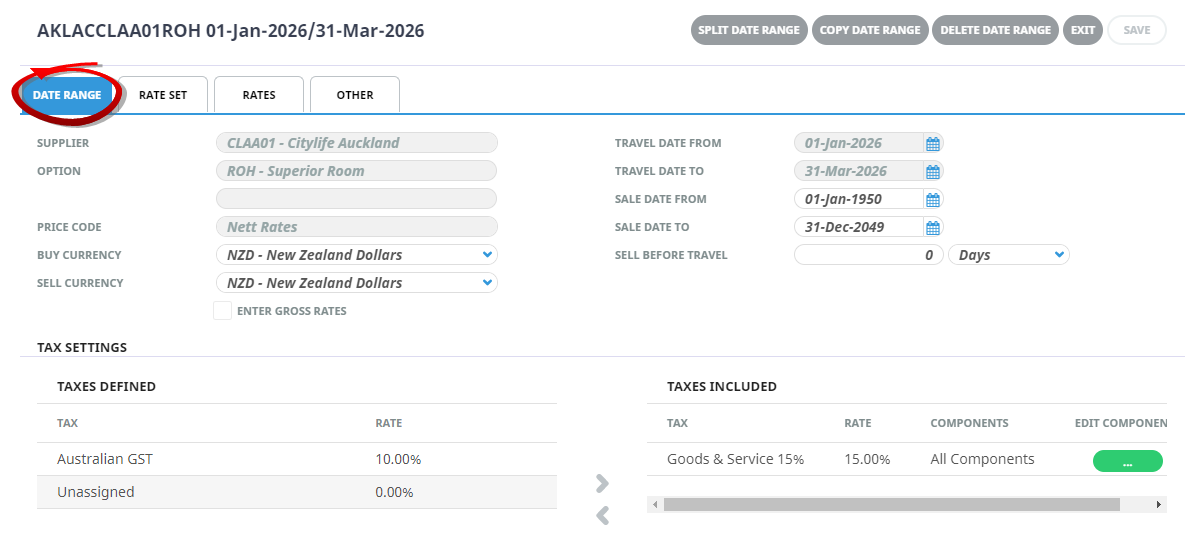
About the Date Range Tab Fields
Header - Full Product Code (view only)
The full product code displays at the top left of the screen. The full product code is generated from the fields inserted at the time of product set up:
- Location
- Service Type
- Supplier Code
- Product Code
Location / Service Type / Supplier / Product Code
AKLACCLAA01ROH 01-Jan-2026/31-Mar-2026
This example is showing a:
- Location of = AKL (Auckland)
- Service type of = AC (Accommodation)
- Supplier of = CLAA01 (Citylife Auckland)
- (Product) Code of = ROH (Run of House)
At a glance users can see the date range selected is 01-January-2026 - 31-March-2026
Header - Dates (view only)
The dates displaying here are the dates entered in previous screen for the rate period.
Supplier, Option, Comment, Price Code (view only)
These fields display to show users the product selected. (these fields are view only and cannot be edited)
Sale Date From/To
The Dates that this rate is able to be sold from/to. These dates default from the Price Code set up but can be overridden here.
Sell Before Travel Days/Months
This field is used when a rate is only valid if booked nn days (or nn months) prior to the date the service is booked for.
Buy Currency
Select the buy currency from the drop-down list. This should be the currency in which the supplier is to be paid – i.e., the default currency that was entered against the supplier when it was setup. (See Add Supplier Currencies). Currencies other than the default can be used if required, but Tourplan will generate the Vouchers and Accounts Payable transactions in the Buy Currency.
Sell Currency
The sell currency can be different from the buy currency. If this is the case, the required Sell Currency can be selected from the drop-down.
NOTE: The sell currency set here does not mean that it is the only currency that the service can be sold at. When a quote or booking is setup, the Agent (client) currency will generally determine what the Booking sell currency is. This means that the service could be in Buy NZD (New Zealand Dollars) and Sell AUD (Australian Dollars), but can be used in a booking which is being output in USD.
Enter Gross Rates
Checking this box will allow gross rates and commissions to be entered, (as opposed to net rates and mark-ups). The cost price will then be calculated.
NOTE: This feature simply operates as a calculator to allow the net price to be calculated and is only available when the buy and sell currencies are the same.
If the supplier provides a rate of '200.00 commission-able at 20%', then 200.00 can be entered as the Rack rate, and the field normally labelled 'Mup' will be labelled 'Comm', which can have 20 (%) entered into it, which then calculates the net rate as 160.00 with 40.00 showing as the markup.
If different Buy and Sell Currencies are used in this screen, it must be understood that there is no relationship between the exchange rate which may have been used to calculate the Sell Price at product rate level, and the exchange rate which may be used to calculate the actual selling price in a quote or booking.
In other words, in this screen there are two values – a buy value and a sell value which happen to have different currency labels on them and at the quoting/booking stage Tourplan’s exchange rate mechanism works out the necessary values based on what currency the quote or booking is being output in.
To make the process of setting up multi-currency rates easier, an exchange rate field is provided below the Sell Currency drop-down, which replaces the Enter Gross Rate checkbox and label, and is only visible when multiple currencies are used. The currency conversion can be based on this field. This editable field also displays under the Rates tab. This exchange rate is not used in the bookings process – the exchange rate(s) from the Tourplan currencies table are used at that time.
NOTE: The Product Database currency rates can be updated in bulk via Home > Products > Product Setup > Rates and examples of that process are covered in the Rate Maintenance section of this document. Examples of using different buy and sell currencies are described in Apply Different Buy/Sell Currencies.
Applying Tax Settings
A Word About Taxes and Tourplan
In general, taxes should only be applied here if there is a responsibility to account for the tax. This would normally be some type of Input/Output tax (VAT, GST etc.). If there is no accounting responsibility associated with the tax,(i.e. Sales Taxes, Bed Taxes etc.) then the cost/sell values entered in the Option Rates screen can include the tax.
This method however raises issues of rate maintenance when the tax rate changes, so the taxes can be setup in the Code Setup Module and then applied here. In doing this, when the tax rate changes, a new tax can be setup with the new tax rate and the Rate Maintenance utility program can be used to add the new tax and update the rates.
NOTE:
- Available taxes display in the ‘Taxes Defined’ column.
- Taxes already attached to the rate, are listed in the 'Taxes Included' column.
Add a Tax to the Taxes Included Column
- Highlight the tax and click the > button (grey right-arrow, which changes to blue when a tax is highlighted).
- Any taxes that have been attached in error can be removed by highlighting the tax in Taxes Included column and clicking the < button (grey left-arrow).
- To view which components of the service the tax applies to, highlight the tax when it is in the Taxes Included column.
- Click the Edit ComponentsEllipsis button.

- In the Tax Applies To screen, select the requiredApplies For check boxes. (By default all check boxes are selected).
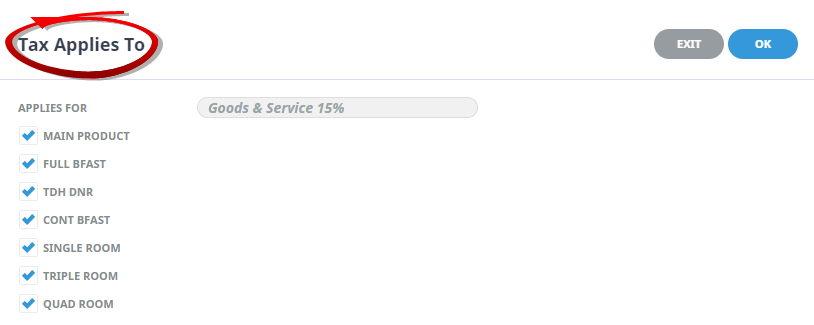
- ClickOK to keep the changes and save or update the entry.

About the Rates Filter
Once several rate entries exist (covering several date ranges), you can use the Rates Filter to find a range. Click the + or - next to the words Rates Filter to expand or collapse the filter fields.
Rates Filter: Collapsed vs Expanded

